Nose drawing is one of the most challenging parts of portrait art because the nose has complex three-dimensional features without clear external borders. Unlike the eyes or mouth, the nose is mainly defined by subtle changes in light, shadow, and structure. Learning to represent it requires understanding how the bridge, tip, nostrils, and surrounding facial planes interact.
A realistic approach begins by seeing the nose as a combination of simple forms rather than a collection of lines. Artists often struggle because they attempt to outline the nose directly, creating harsh edges that do not exist in real life. Instead, successful drawings use circles, guidelines, and tonal transitions to create volume.
Whether working with graphite, charcoal, digital brushes, or other mediums, the same principles apply. Proportion, perspective, anatomy, and value control determine whether a nose appears flat or convincingly three-dimensional.
This guide explores the foundations behind realistic nose construction, explains common mistakes, and examines how modern artistic tools are changing the way beginners and professionals approach facial studies.
Understanding the Structure Behind a Realistic Nose
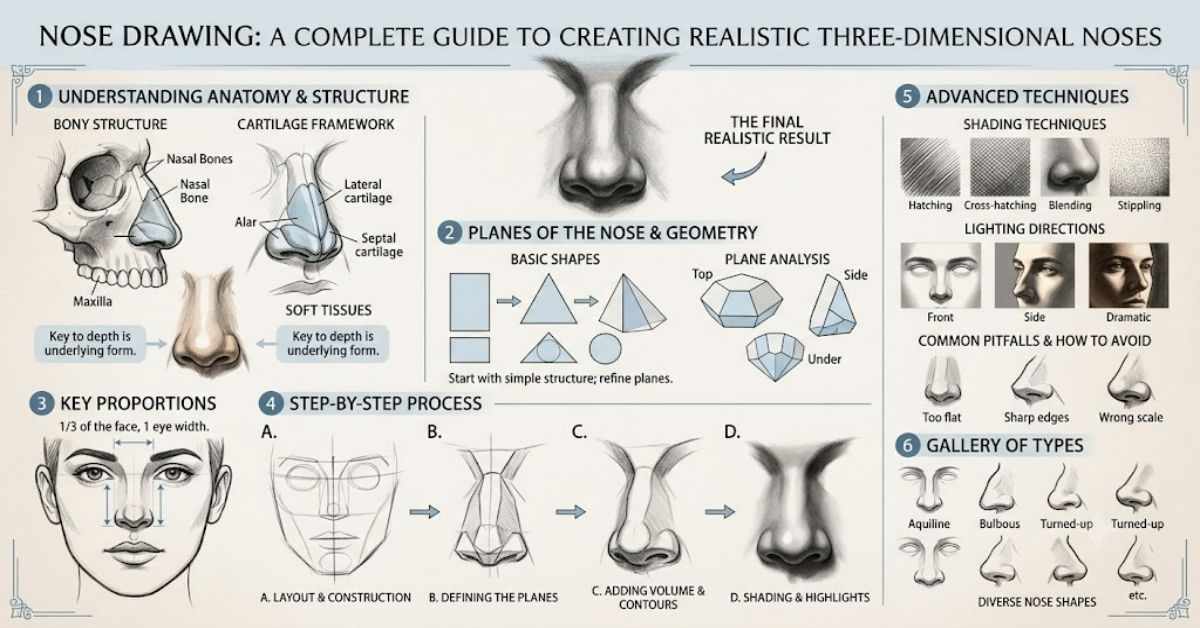
The human nose is made from several anatomical components that work together:
- Nasal bridge
- Nasal bones
- Cartilage structure
- Tip of the nose
- Alar wings around the nostrils
- Nostrils and surrounding shadows
Artists do not need to memorise every anatomical detail, but understanding these areas helps create believable forms.
A useful method is to imagine the nose as a series of connected geometric shapes. The upper section can be treated like a narrow rectangular prism, while the tip can be simplified into rounded forms. This approach allows artists to rotate the nose mentally when drawing different viewpoints.
Comparing Nose Construction Methods
| Method | Strengths | Limitations | Best For |
| Geometric construction | Improves accuracy and perspective | Requires practice | Beginners and portrait artists |
| Outline-based drawing | Quick initial sketches | Often creates flat results | Simple illustrations |
| Tonal modelling | Creates realistic depth | Requires shading skills | Advanced artwork |
| Digital 3D references | Helps study angles | May reduce observational skills | Digital artists |
The most effective approach combines construction and shading rather than relying on one technique alone.
How Geometric Shapes Improve Nose Drawing
One of the most important lessons in portrait creation is that objects should be understood through form before detail.
When starting a sketch, artists can follow these stages:
Build the Basic Framework
Begin with a centre line showing the direction of the face. Add horizontal guides to indicate the eye line and base of the nose. These references prevent distortion.
Create the Main Planes
The nose contains several planes that catch different amounts of light. The bridge usually receives stronger highlights, while the sides often transition into softer shadows.
Add Rounded Features
The tip and nostril areas should not be drawn as separate symbols. They are curved structures connected to the larger form.
This process explains why experienced portrait artists often spend more time constructing a nose before adding details.
The Role of Light and Shadow
A common mistake in portrait drawing is focusing too much on lines. In reality, noses are recognised mainly through value changes.
A strong shading strategy considers:
| Area | Typical Visual Treatment |
| Bridge | Soft highlight or mid-tone |
| Side planes | Gradual shadow transition |
| Tip | Rounded shading with reflected light |
| Nostrils | Darkest areas but not pure black |
| Connection to cheeks | Soft blending |
Light direction determines the entire appearance of the feature. A nose under direct lighting may appear sharply structured, while soft lighting creates gradual transitions.
Common Mistakes Artists Make
Even skilled artists can struggle with facial proportions. Several errors appear frequently.
Using harsh outlines:
Real noses rarely have visible borders. Strong lines around the nose can make portraits appear cartoon-like.
Ignoring perspective:
A front-facing nose differs greatly from a three-quarter or side view. The width, nostril placement, and visible planes change depending on the angle.
Over-darkening shadows:
Beginners often make nostrils and side shadows too dark, causing the nose to look artificial.
Skipping observation:
Studying photographs, sculptures, and real faces develops a better understanding of structure.
The Impact of Digital Tools on Portrait Learning
Digital platforms have changed how artists practise facial features. Applications with layers, adjustable brushes, and reference tools allow learners to experiment without wasting physical materials.
However, digital convenience also creates challenges. Some artists depend heavily on tracing tools or automated references instead of developing observation skills. The strongest results come from combining technology with traditional study methods.
A practical workflow is:
- Analyse a reference image.
- Sketch basic forms.
- Check proportions.
- Add shadows gradually.
- Refine details only after the structure works.
This method applies equally to paper and digital environments.
The Future of Nose Drawing in 2027
By 2027, artificial intelligence and digital modelling tools are likely to become more common in art education. AI-assisted reference generation, virtual anatomy models, and interactive drawing applications may help students understand facial structures faster.
However, human observation will remain essential. Artistic skill depends on interpretation, not simply copying information. Future tools are expected to support learning rather than replace fundamental drawing abilities.
Educational platforms are also increasingly focusing on accessible digital art training, allowing more people to study portrait techniques without expensive equipment.
Key Takeaways
- Realistic facial features come from understanding structure rather than copying outlines.
- Geometric construction creates stronger foundations for accurate portraits.
- Lighting and shadow are more important than excessive detail.
- Digital tools can support learning but should not replace observation.
- Consistent practice improves proportion, perspective, and confidence.
Conclusion
Creating realistic portraits requires patience, observation, and an understanding of three-dimensional form. Nose drawing becomes easier when artists stop treating the nose as a complicated outline and instead view it as a combination of simple structures affected by light.
The strongest drawings balance anatomy, proportion, and artistic interpretation. Whether created with pencil or digital tools, successful nose studies come from practising construction methods and learning how subtle changes in value create depth. With consistent study, artists can transform one of the most difficult facial features into an opportunity for improving their overall portrait skills.
Frequently Asked Questions
What is the easiest way to start a nose drawing?
Start with simple guidelines and geometric shapes. Establish the direction, width, and basic planes before adding details or shading.
How do artists make noses look three-dimensional?
Artists create depth by combining accurate proportions with highlights, mid-tones, and shadows that follow the nose’s natural planes.
Why do beginners struggle with drawing noses?
Many beginners focus on outlines instead of structure. Because noses have soft edges, understanding form is more important than drawing strong lines.
Can digital tools improve portrait drawing skills?
Yes, digital tools provide useful references and editing options, but artists still need traditional observation and construction practice.
How long does it take to learn realistic nose drawing?
Progress depends on practice frequency. Regular studies over several months can significantly improve accuracy and confidence.
Methodology
This article was developed using established portrait drawing principles from recognised art education practices, including anatomical study methods and observational drawing techniques. Information was reviewed against general principles used in figure drawing education.
The analysis focuses on practical artistic methods rather than claiming personal studio testing or original measurements. Limitations include differences between individual artistic styles, materials, and learning approaches.
Suggested editorial review: verify all artistic references, add contributor credentials where required, and confirm any external citations before publication.